Showing posts with label linux. Show all posts

2020-09-29

Linux WiFi disabled after a long period of no activities: bad wifi powersave

I have Lubuntu 18.04 on my Dell Inspiron 5000 laptop. A recurring problem is that the WiFi becomes unavailable after I leave my laptop on for a long period. The problem won't appear if I always put it back to sleep before leaving it idle for a long time. Once the problem happens, I have to turn off and turn on the computer exactly twice to fix it. Rebooting (e.g., sudo reboot) won't even fix it. 

Today I was so annoyed by this problem so I googled around. I am not alone. Nearly everyone who had the issue points to WiFi power management. Some say that it just took a really long time, e.g., 30 seconds, for the WiFi adapter to wake up from sleep. Some has the problem after system wake up from suspension -- but I don't have this problem. 

 It turns out that the most effective fix is to simply disable WiFi power management to prevent the WiFi adapter from going into powersave mode. Just edit

/etc/NetworkManager/conf.d/default-wifi-powersave-on.conf
and change the line
wifi.powersave = 3
into
wifi.powersave = 2

However, this also means that you will waste energy on WiFi when the computer is idle. 

Below are some links for those who want more information. 

  • https://www.reddit.com/r/Lubuntu/comments/54endb/help_new_install_but_wifi_disconnects_randomly/ 
  • https://core.docs.ubuntu.com/en/stacks/network/network-manager/docs/reference/snap-configuration/wifi-powersave

  • https://askubuntu.com/questions/1022203/how-to-prevent-wifi-sleep-after-suspend 
  • https://askubuntu.com/questions/695867/disable-wifi-power-management/961460
  • https://askubuntu.com/questions/1030653/wifi-randomly-disconnected-on-ubuntu-18-04-lts

2018-11-09

A filesystem being mounted as either ext4 and ext3?

I came across a very interesting problem on my computer today when moving my Dropbox folder as Dropbox is dropping support for non-ext4 filesystems on Linux now. I wasted a lot of time on this as I always believed that this partition was in ext4. So I couldn't figure out why I couldn't get expected by following instructions.

I could mount a partition on my hard drive as either ext4 or ext3 format. Dropbox's daemon is not stupid. If the partition is mounted as ext3, it will complain.

So here is the details. If I do not specify the format, it will be mounted as an ext3 partition.

forrest@test:~$ sudo mount  /dev/sdd1 /mnt/test/
forrest@test:~$ mount | grep sdd1
/dev/sdd1 on /mnt/test type ext3 (rw,relatime,data=ordered)

If I specify the ext4 format, it will be mounted as an ext4 partition.

forrest@test:~$ sudo umount /dev/sdc1
forrest@test:~$ sudo mount -t ext4 /dev/sdd1 /mnt/test/
forrest@test:~$ mount | grep sdc1
/dev/sdd1 on /mnt/test type ext4 (rw,relatime,data=ordered)


I don't know why. But it confused me quite a bit.

2017-09-23

Tuning Grub 2, the bootloader

Below of some useful tips for Grub2, the open source bootloader. You are to edit the file /etc/default/grub. After you are done with any of the changes below, run
sudo grub-update
to apply the change.

1. Get rid of the submenu:

Add a line:
GRUB_DISABLE_SUBMENU=y

2. Set the default entry: https://help.ubuntu.com/community/Grub2/Submenus

3. If you want your Linux system to book into text mode/console/command line, just follow this http://ubuntuhandbook.org/index.php/2014/01/boot-into-text-console-ubuntu-linux-14-04/ Basically, you need to make the following changes.

3.1 Uncomment or enable the line GRUB_TERMINAL=console
3.2 Commend or disable the line GRUB_CMD_LINE_LINUX_DEFAULT="quiet splash" or whatever value on the right hand side of the equal sign.
3.3 Change GRUB_CMDLINE_LINUX=”” to GRUB_CMDLINE_LINUX=”text”

4. Leave you a timeout for changing Grub at system boot

Remember to always set a non-zero value for GRUB_TIMEOUT, e.g.,
GRUB_TIMEOUT=10
in case something goes wrong.

But it is not terribly bad if you mess up. Just mount the drive in which you Ubuntu is installed, go to /boot/grub/grub.cfg to edit the settings.

2017-09-20

Connecting to a WiFi network on Linux at startup without GUI

Many embedded Linux platforms are expected to connect to a WiFi network at startup automatically. And the Linux system is booted into multi-user model, i.e., no GUI, X window, or desktop environment. A lot of the solutions, e.g., making a connection available for all users, floating on the Internet are for Linux systems that boot into a desktop environment. In those cases, the nm-applet, which has an icon sitting in the tray area of the desktop environment, handles the connection to WiFi.

The discussion below applies to Ubuntu 15.04+, which uses systemd to manage initialization process.

Background

NetworkManager is a daemon that manages networking devices on Linux systems. It has become the de facto network managing program for Linux since its introduction in 2004. See more at Wikipedia: https://en.wikipedia.org/wiki/NetworkManager

Since it is a daemon, users interact with it via other applications. On most modern Linux distributions, you see an icon on the tray area, that once clicked, will give you a list of WiFi network IDs (SSIDs). This application is called nm-applet. NetworkManager also has a command line interface called nmcli.

Easy solution: Connect once and remember.


NetworkManager will automatically connect to a WiFi network that was connected to previously. So, you can connect to a WiFi network under a desktop environment using nm-applet, or use command line (see below), then boot into no-GUI (e.g., system level 3) forever, and enjoy the same WiFi network forever.

If you've connected to multiple WiFi networks before, it's very hard to say which one will be connected to in the future, supposing they will all be available. Most likely, the very last one connected to will be the top candidate. If unsure, see the next two sections.

In case you need to connect to a WiFi network via command line

There are many cases that you want to specify which WiFi network to connect to, e.g., the first time or you want to switch the network. The command to connect to a WiFi SSID uses the following syntax:
nmcli device wifi connect $SSID
For example,
nmcli device wifi connect Haha
where H360 is the SSID.

Specifying the WiFi network to connect to at startup


As mentioned earlier, if you have connected to multiple WiFi networks before, NetworkManager will use an algorithm, which is unfortunately unclear and thus underterministic to me, to pick one (assuming that they are all still available) the next time. To ensure to connect to a particular network, you can create a startup service for systemd, the initialization manager of modern Linux, to be executed at system startup.

Let's call the service mywifi. Create a file called mywifi.service under
/etc/systemd/system
with content like this:
[Unit]
Description=Connect to Haha

[Service]
ExecStart=/usr/bin/nmcli device wifi connect 

[Install]
WantedBy=multi-user.target

As you can see, the command to connect to a network called H360 is to be executed at startup, only when the system is booting into multi-user level (see the Red Hat doc for levels.)

Then enable this service and finally reboot
systemctl enable mywifi

By "enable", we mean automatically running this service at startup without logging in.

Troubleshooting: device unavailable

I had some rare cases that a WiFi interface device is unavailable. Simply stop and restart the NetworkManager service may solve the problem:
systemctl stop NetworkManager
systemctl start NetworkManager

Some examples for using nmcli

forrest@A785GM-M:~$ nmcli device status
DEVICE           TYPE      STATE        CONNECTION 
wlx001478962ea6  wifi      connected    Haha 4     
en2s0            ethernet  unavailable  --         
lo               loopback  unmanaged    --         
forrest@A785GM-M:~$ nmcli general status
STATE      CONNECTIVITY  WIFI-HW  WIFI     WWAN-HW  WWAN    
connected  full          enabled  enabled  enabled  enabled 
forrest@A785GM-M:~$ nmcli radio wifi
enabled
forrest@A785GM-M:~$ nmcli dev wifi
*  SSID            MODE   CHAN  RATE       SIGNAL  BARS  SECURITY  
*  Haha            Infra  1     54 Mbit/s  100     ▂▄▆█  WEP          
   TP-LINK_6DFF    Infra  5     54 Mbit/s  100     ▂▄▆█  WPA1 WPA2 
   --              Infra  10    54 Mbit/s  100     ▂▄▆█  WPA2      
*  Haha            Infra  1     54 Mbit/s  99      ▂▄▆█  WEP     

References

2014-06-09

Stepper motor control with EasyDriver and Python on Linux desktop

My Mechanical Engineering colleagues recently asked me to build them a software-controlled stepper motor system - they wanna apply high-power pulse laser on the surface of rotating objects. Of course, the software must have GUI.


Hardware

I decided to control the stepper motor using a Linux PC with parallel ports (yes, people are still building motherboards with parallel ports), because developing software for desktop Linux is much easier. Oh, for tablets and smart phone fans, how do your devices talk to physical world? 

In searching for a proper driver chip/board for the stepper motor, I came across the handy EasyDriver board designed by Brian Schmalzhaus. I just need to provide one rising edge to the STEP pin of it, the stepper motor will rotate one step. I can control the direction of rotation and step size by configuring certain pins. It saves me the hassle of computing waveforms for controlling stepper motors. Check the references below to see how EasyDriver can simply your life.

Lastly, very important, let the EasyDriver board and the PC share the common ground. Otherwise the control signal from parallel port may not work (e.g., a high from parallel port is not high to the ground level of EasyDriver), or the parallel port might get burned.

Oh, one more thing, the EasyDriver board only drives bipolar stepper motors.

My circuit is prototyped on a breadboard like below:

The circuit takes power from the power supply of the desktop computer on which the control software will run. I used Pin 2 and Pin 4 of the parallel port to control the STEP and DIR on Easy Driver. MS1 and MS2 are grounded because I only use full step mode. I used two LEDs to show the signals from parallel ports.

Here is circuit in reality. As you can see, the circuit takes power from the old floppy disk power jack.


I used Saleae's Logic as a USB logic analyzer to check the waveforms. As you can see, for every rising edge on channel 4, the state of the first 4 channels change.

Software

At first I planned to use parapin, a C-based library for parallel port I/O. I used it when I was in college. After googling, I found out a Python module called PyParallel and it greatly simplifies software development.

I wrote a small piece of Python code below to control it.
"""This software is free software licensed under GNU GPL 3.0
Copyleft 2014 Forrest Sheng Bao http://fsbao.net

Dependencies: 
1. pyparallel: Can be installed on Ubuntu via
            sudo apt-get install python-parallel

Notes for Linux: 
1. make sure you execute
      sudo rmmod lp
           and
      sudo modprobe ppdev
  on your Unix shell first. 
2. Add yourself into lp user group on your system if you don't wanna use sudo all the time. 

Help the people under Communism tyranny in China, North Korea, Viet Nam and Cuba. 

"""

def rotate(Step, Dir, Step_Pin=5, Dir_Pin=2, Delay=0.25):
    """Rotate the motor by _Step_ steps in _Dir_ direction

    Input
    =======
    Step: integer
    Dir: string, 0 for clockwise and 1 for counterclockwise
    Step_Pin: int, the pin used to control stepping signal
    Dir_Pin: int, the pin used to control rotation direction
    Delay: float, the delay between each step. Do not set it 
           too small to exceed your motor's speed limit. 

    Notes
    =======
    The data pins in parallel ports are from 2 to 8. 

    """

    import parallel
    import time
    p = parallel.Parallel()

    p.setData(0)

    for i in range(int(Step)):
        p.setData(2 ** (Dir_Pin - 2) * Dir) # set or keep direction
        time.sleep(Delay)
        p.setData(2 ** (Dir_Pin - 2) * Dir + 2 ** (Step_Pin - 2)) # keep direction and rotate
        time.sleep(Delay)
    
#    p.setData(0)
    
if __name__ == "__main__" :
    import sys
    Step = int(sys.argv[1])
    Dir  = int(sys.argv[2])
    Delay = float(sys.argv[3])
    rotate(Step, Dir, Delay=Delay)


Note

1. The chip on EasyDriver can get really hot - up to 136 Celsius! Do not use it with a motor that requires lots of current and/or rotate the motor too frequently. Mine got burned out pretty soon. So I am ordering a motor with less torque but smaller current.
2. Do not send pulse to STEP pin of EasyDriver faster than the maximum speed of your motor. It will cause damage.

Questions and comments are all welcome!

References:

1. Easy Driver Example by Brain Schmalzhaus himself, http://www.schmalzhaus.com/EasyDriver/Examples/EasyDriverExamples.html
2. Easy Driver Example by Sparkfun, https://www.sparkfun.com/tutorials/400


2012-04-03

Linux, the best gaming platform

Why? Because it's super easy to start a game.

Step 1: Login and startx

Step 2: Start the Game.

Step 3: Just play.

2012-02-07

SSH log-in without password

SSH has a cool feature that you can use your security key to authenticate rather than your password. In this way, you don't have to enter password all the time. Here is how you can do that.
  1. Run
    ssh-keygen
    command on your Shell/Terminal. Follow the instructions. It will generate your public key and private key pair. 
  2. Run
    ssh-copy-id user@host
    to send your public key to the host. 
  3. Now try to connect to the server and you should not be asked for password again. 
 References:
  1. http://pkeck.myweb.uga.edu/ssh/
  2. http://linuxproblem.org/art_9.html

    2009-08-22

    To say "Hello world" in Python CGI Web Programming in 5 minutes

    by Forrest Sheng Bao http://fsbao.net

    I have lotta Python programs for bioinformatics research. I wanted to put them onto the web. I only developed Web apps in PHP before. And it seemed to be a big pain for porting a Python program to the web. But, I figured out in 5 minutes.

    First, you need an Apache server on your Linux/Mac OS/Windows box. If you are gonna use data base, you need a database server. There are tons of blogs addressing these issues. So I won't be gossipy here. Suppose everything we mention below happens on your server-even web browsing.

    Second, configure cgi in Apache. There are many ways to run a Python program on a web/http interface. I think CGI is the easiest. Assume you are on your own server and using all default settings. On Ubuntu Linux 9.04, the default configuration file for your default website is /etc/apache2/sites-available/default Open it, find the part for cgi directory, and make it like this

    ScriptAlias /cgi-bin/ /var/www/cgi-bin/
    <Directory "/var/www/cgi-bin">
    
    AllowOverride None
    Options +ExecCGI -MultiViews +SymLinksIfOwnerMatch
    #Order allow,deny
    Require all granted
    Allow from all
    AddHandler cgi-script .py              # tell Apache to handle every file with .py suffix as a cgi program
    AddHandler default-handler .html .htm  # tell Apache to handle HTML files in regular way
    
    </Directory>
    

    The line

    ScriptAlias /cgi-bin/ /var/www/cgi-bin/

    specifies the path of cgi codes and the actual directory of your program. So when you type http://127.0.0.1/cgi-bin, the Apache will look into the directory /var/www/cgi-bin/ of your localhost.


    Also, make sure that cgimodule of Apache is enabled. You can enable it by

    sudo a2enmod cgi


    Now restart your apache. On Ubuntu Linux, by default installation and configuration, it is
    sudo /etc/init.d/apache2 restart
    

    Third, write up a Hello, World! program.

    #!/usr/bin/env python
    print "Content-Type: text/html"
    print
    print """\
    <html>
    <head><title>First Python HTTP Programming </title></head>
    
    <body>
    <h2>Hello World!</h2>
    </body>
    </html>
    """


    Now open http://127.0.0.1/cgi-bin/hello.py in your web browser and you shall see a hello world in it.

    Reference: http://webpython.codepoint.net/cgi_tutorial

    2009-07-06

    Video Tutorial: Debugging C++ programs in anjuta

    by Forrest Sheng Bao http://fsbao.net

    I just made a video tonight on how to debug a C++ program in anjuta, the open-source C/C++ IDE for Linux. anjuta is one component of GNOME development suite and thus part of GNOME project. I think it is very good, just a bit worse than Apple Xcode. But it is definitely way better than Microsoft Visual Studio. Microsoft should do some study on user interface design. Proper menu design, window layout and usability is more user-friendly than eye candies. Sadly, Microsoft focuses too much on eye candies, and makes using their software like dating a girl - every step is very complex.

    So, very easy few steps:

    1. Build -> Remove Configuration
    2. Build -> Configure Project. Select "Configuration" as "Debug"
    3. Build -> Build Project
    4. Run -> Run Parameters. Select the executable file compile as Debug Mode. By default, the executable file should located at PROJECT_ROOT_PATH/Debug/src/
    5. Set breakpoints
    6. Run -> Debug Program
    7. Select proper window at the bottom to view variable values, etc.

    I will add annotations these days since I didn't record voice with that video. Comments and questions are welcomed.

    The screenshot video is made by xvidcap, thanks for that open-source team. You can run "sudo apt-get install xvidcap" on Ubuntu Linux to install it in a snap.

    2009-05-14

    EDFbrowser working with discontinuous EDF+ file

    by Forrest Sheng Bao http://fsbao.net

    EDFbrowser is an open source EDF Browser. EDF/EDF+ is an open file format for biomedical time series, especially EEG and ECG/EKG signal.

    But, the pain is, new (version 1.08 or later) EDFbrowswer "disabled the possibility to open discontinuous files."

    I consulted the author, Teunis van Beelen, and got a solution from him.
    1. Open the file mainwindow.cpp in a texteditor.
    2. Comment the lines 1293 to 1310. Put /* and */ at the beginning and end of following code
      if(edfhdr->discontinuous)
      {
      if(edfhdr->edf)
      {
      UI_Messagewindow popuperror("Error", "EDFbrowser can not show EDF+D (discontinuous) files.\n"
      "Convert this file to EDF+C first. You can find this converter\n"
      "in the Tools menu (EDF+D to EDF+C converter).");
      }

      if(edfhdr->bdf)
      {
      UI_Messagewindow popuperror("Error", "EDFbrowser can not show BDF+D (discontinuous) files.\n"
      "Convert this file to BDF+C first. You can find this converter\n"
      "in the Tools menu (EDF+D to EDF+C converter).");
      }

      free(edfhdr->edfparam);
      free(edfhdr);
      fclose(newfile);

      return;
      }
      Now compile the source code by executing qmake && make and you are done.
    Modifying this source code and recompiling it is legal since this software is distributed under GNU GPL v 2.

    Installing QTGTKstyle on Ubuntu 9.04

    by Forrest Sheng Bao http://fsbao.net

    1. sudo apt-get install libcairo2-dev libatk1.0-dev libgtk2.0-dev
    2. Follow instructions here: http://labs.trolltech.com/page/Projects/Styles/GtkStyle

      Note, the last command should be sudo make install. There is no rule "checkinstall."
    I wonder why there is no for QTGTKStyle Ubuntu deb package in which I can use apt-get to install in one line of command. Coz QTGTKStyle is too new?

    2009-05-13

    Displaying compiling process in MAKE

    by Forrest Sheng Bao http://fsbao.net

    I need to play around with couple of logic stuffs this summer, SAT solvers, ASP solvers, ASP grounders, etc. So, I need to compile lotta codes this summer. Today, I found a cool stuff.

    There is an ASP grounder called Gringo, a Spanish word used by Latin Americans to call {Crazy} Yankees (not Asian/African/Hispanic/Native Americans or Martian(from the Mars) Americans but Caucasian Americans) as we call Canadians "Canuck." - How do Canadians call Russians on the North side? Well, over the pole.

    Their source code is packed with cmake scripts. So, when I compile it, it looks like this:
    forrest@dophin:~/gringo-2.0.3-source/build/gringo/release$ make
    Scanning dependencies of target gringo-lib_pch_dephelp
    [ 1%] Building CXX object lib/gringo/CMakeFiles/gringo-lib_pch_dephelp.dir/gringo-lib_pch_dephelp.o
    Linking CXX static library ../libgringo-lib_pch_dephelp.a
    [ 1%] Built target gringo-lib_pch_dephelp
    Scanning dependencies of target pch_Generate_gringo-lib
    [ 1%] Generating gringo.h
    [ 1%] Generating gringo.h.gch/gringo-lib_Release.h++
    [ 4%] Built target pch_Generate_gringo-lib
    Scanning dependencies of target gringo-lib
    [ 6%] Building CXX object lib/gringo/CMakeFiles/gringo-lib.dir/src/avgaggregate.o
    [ 7%] Building CXX object lib/gringo/CMakeFiles/gringo-lib.dir/src/statementchecker.o
    [ 9%] Building CXX object lib/gringo/CMakeFiles/gringo-lib.dir/src/smodelsconverter.o
    [ 10%] Building CXX object lib/gringo/CMakeFiles/gringo-lib.dir/src/output.o
    and this at the end:
    [ 90%] Building CXX object lib/gringo/CMakeFiles/gringo-lib.dir/generated/plainlparselexer.o
    [ 92%] Building CXX object lib/gringo/CMakeFiles/gringo-lib.dir/generated/lparseconverter_impl.o
    Linking CXX static library ../libgringo.a
    [ 92%] Built target gringo-lib
    Scanning dependencies of target gringo-app
    [ 93%] Building CXX object app/CMakeFiles/gringo-app.dir/main.o
    [ 95%] Building CXX object app/CMakeFiles/gringo-app.dir/options.o
    /home/forrest/gringo-2.0.3-source/app/options.cpp: In function ‘bool::parseInt(const std::string&)’:
    /home/forrest/gringo-2.0.3-source/app/options.cpp:172: warning: ignoring return value of ‘long int strtol(const char*, char**, int)’, declared with attribute warn_unused_result
    [ 96%] Building CXX object app/CMakeFiles/gringo-app.dir/timer.o
    [ 98%] Building CXX object app/CMakeFiles/gringo-app.dir/program_opts/program_options.o
    [100%] Building CXX object app/CMakeFiles/gringo-app.dir/program_opts/value.o
    Linking CXX executable ../bin/gringo
    [100%] Built target gringo-app
    I do not know how the process is shown. But it looks pretty cool. If you know how, please let me know.

    2009-04-09

    How does MATLAB benchmark work?

    by Forrest Sheng Bao http://fsbao.net

    I got a new iMac, the latest 24-inch one with 4G DDR3 memory, 2.66 G Intel Core 2 Duo CPU and NVIDIA GeForce 9400M graphic card.

    So, I plan to compare the performance of the same box on Mac OS 10.5 and Ubuntu Linux 9.04 Beta (2.6.28-11 kernel) respectively. The first stuff I tried is MATLAB R2009a.

    But I got quite confused regarding how MATLAB benchmark works. I typed bench on MATLAB shell 3 times sequentially, and got following results:
    0.1471    0.3886    0.1981    0.3178    0.1815    0.0053
    0.0918 0.1435 0.1597 0.2413 0.1659 0.0026
    0.0805 0.1395 0.1601 0.2381 0.1633 0.0027
    I noticed the huge different among them. So I did a bench(10), which will run the benchmark 10 times. I got this:
    0.0939    0.1413    0.1603    0.2455    0.1436    0.0044
    0.1106 0.1409 0.1594 0.2379 0.1715 0.0030
    0.1145 0.1559 0.1601 0.3205 0.1415 0.0026
    0.0584 0.1426 0.1601 0.2354 0.1456 0.0044
    0.0799 0.1446 0.1607 0.2784 0.1354 0.0044
    0.0900 0.1385 0.1597 0.2375 0.1468 0.0044
    0.0983 0.1597 0.1606 0.2851 0.1533 0.0027
    0.0770 0.1445 0.1619 0.2373 0.1629 0.0044
    0.0810 0.1466 0.1651 0.2493 0.1217 0.0027
    0.0892 0.1402 0.1605 0.2367 0.1697 0.0028
    This drove me crazy. Let MATLAB do me a favor.
    >> min(result(:,1))

    ans =

    0.0584

    >> max(result(:,1))

    ans =

    0.1145
    Still not clear?
    >> (max(result(:,1))-min(result(:,1)))/max(result(:,1))

    ans =

    0.4902
    Or, you want a more professional answer?
    >> std(result(:,1))/mean(result(:,1))

    ans =

    0.1852
    See the problem? The result equals to this story: Sometimes I need 1 day to build Rome while sometimes I need 2 days to build Rome.

    The same machine, the same Linux kernel, the same version of MATLAB composed different stories for us.

    The six columns of benchmarking result are of these six tasks:
        LU       LAPACK.                  Floating point, regular memory access.
    FFT Fast Fourier Transform. Floating point, irregular memory access.
    ODE Ordinary diff. eqn. Data structures and M-files.
    Sparse Solve sparse system. Mixed integer and floating point.
    2-D plot(fft(eye)). 2-D line drawing graphics.
    3-D MathWorks logo. 3-D animated OpenGL graphics.
    Please ignore the last two columns of my result since I enabled -nojvm option when starting MATLAB. Thus, I didn't actually plot.

    Dual-boot Linux and Mac OS X on Intel-based iMac

    by Forrest Sheng Bao http://fsbao.net

    I just got a new iMac. Yes, the latest Apple iMac, the 24-inch one, with 4G DDR3 memory, 2.66GHz Intel Core 2 Duo CPU (almost 15, 000 integer MIPS (Dhrystone) and 5,000 floating point MIPS (Whetstone)), and nVidia GeForce 9400M graphic processor.

    Ok, so, how to install Ubuntu on an Intel-based iMac? There is a good instruction for you at Ubuntu Help. https://help.ubuntu.com/community/MactelSupportTeam/AppleIntelInstallation

    The general idea is:

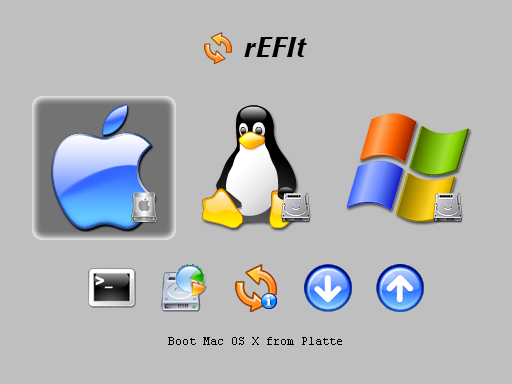
    1. Google, download and install rEFlt. Make sure that you can see its interface when you boot up your Mac. Most likely, you need to SHUTDOWN the Mac and then start it. RESTART does not work. If you update your Mac OS X, Mac OS X may rewrite the bootload. So you need to reinstall rEFlt in Mac OS X. It should be look like the one on rEFlt official website, but without Linux and Windows option, just a Mac OS X.
    http://refit.sourceforge.net/screen.html


    2. Prepare the partition for Linux. You can use BootCamp Assistant or Disk Utility to do so. I splitted a big partition for Linux and used Ubuntu installation program later to do further partitioning, i.e. one for / and one for swap.


    3. Insert Ubuntu installation CD into Mac and reboot your Mac from it. Install it. Do remember to install bootloader on the Linux root partition (NOT MBR or other places) by clicking Advanced button like this:

    This is how my bootloader selection menu looks like.


    Update 2011-12-23: I fully swiped out Mac OS X on my iMac. Now it has only Ubuntu Linux. This is how the bootloader selection look like now.


    4. Reboot when done with the install, and in the rEFIt menu, choose the partition tool. It will attempt to sync the partition tables on your disk. Then SHUTDOWN the computer (not reboot), and start it up. You should be able to boot to Ubuntu now.

    Here is a video regarding how Linux booted from my iMac.

    2009-04-06

    Agilent ADS 2009 on Ubuntu Linux 9.04

    by Forrest Sheng Bao http://fsbao.net

    Agilent ADS is a great tool for circuit simulation on Linux.

    1. Install ksh

    sudo apt-get install ksh

    2. Download and extract ADS2009 installation files. Enter the directory that stores all installation files. Run

    ./SETUP.SH

    and follow on-screen instructions.

    Be sure to set the proper path for ADS2009. ADS2009 could be very big, 5.5 GB. So it is better to install it on a separate partition other than your root partition, like below.

    3. Set necessary environmental variables. The HPEESOF_DIR environmental variable should be set to be equal to the path to the installation directory and add HPEESOF_DIR/bin into $PATH. Activate new environmental variables (You can logout and login again or source profile files.)

    4. (Optional for 64-bit Linux) Install 32-bit libmotif. First, download 32-bit libmotif.

    For Jaunty Jackalope, you can download it from http://packages.ubuntu.com/jaunty/libmotif3

    Then, extract the deb package. One file you can find from extracted libmotif3 deb package is data.tar.gz. The data.tar.gz in libmotif3 deb package contains all 32-bit libmotif3 libraries required by ADS2009. Extract it and you shall find a directory called usr in it. Enter that directory and enter the lib subdirectory. Copy every *.so.* file into /usr/lib32 (You may need root privilege to do so).

    5. Add license server at pop-up window when your first type ads on the shell for the first time. This step depends on your license type. For me, I connect to a license server. For you, maybe it is a license file.

    Now you are ready to run ADS2009.

    2009-03-17

    Geeks, call me on Ekiga!

    by Forrest Sheng Bao http://fsbao.net

    I am really tired of the stupid Skype, though Skype has many users around the world - people are stupid. The problem of Skype to me is
    1. No native 64-bit support for Linux and I need hacking to make 32-bit Skype like my webcam in 64-bit Linux - We have been waiting for this for at least 2 years.
    2. Closed source code and protocol
    3. Unknown mechanism on managing our privacy - because of problem #2
    4. Not friendly with some hardware on Linux - I am tried of struggling on this
    According to my experience, open source solution can work better than proprietary solution if the developers themselves need this solution very much. So it is. Geeks need to talk and video each other. Then here comes the Ekiga! http://ekiga.org

    What is Ekiga? It is a software/solution thru which you can video chat your friends on another PC, if both of you are using Ekiga. And it is free, free as Skype and free as in freedom - totally open source solution.

    I tried it tonight. Great! I don't have to struggle on hardware problem - everything works perfectly with my 64-bit Ubuntu Linux.

    So, geeks, if you want to call me next time, do NOT use Skype but Ekiga. My Ekiga username is my first name and last name @ekiga.net

    In most Linux distributions, you can find it under the "Internet" application menu. Now set it up and try a test voice: "1,2,3, Ekiga rocks!"

    PS: Currently, I am not sure whether Ekiga can work with traditional phone network as well as Skype. For example, if I purchased a number, can Ekiga forward the call to another phone? I use this function in Skype. If this problem can be solved, everything is done. Anyway, I know Grandcentral/Google Voice can make it. So, let's see.

    2009-03-16

    Python editing and debugging on Linux

    by Forrest Sheng Bao http://fsbao.net

    Python is my favorite programming language. There are many Python editors, debuggers and IDEs. Some good editors/IDE are geditor(comes with Gnome desktop by default), SPE (Stani's Python Editor) and Eric. There is a debugger with GUI called Winpdb. The default debugger is IDLE, developed by Python Software Foundation.

    If I don't need to debug my program, I will only use geditor or even vim simply. If I need to debug, I will use Eric. In Eric, I have all the buttons I need on the toolbar and I can debug it without calling other programs. A trick of Eric is that I can use regular expression to hide some variables I don't want to see, as you can see in this snapshot.

    The reason I mention Winpdb is because sometimes I am so lazy to hide variables I don't want to see. I just want to view certain varibales I am interested in. Winpdb provides me a way in its command console. I just need to type in "v variable_name" then I can see the value of a perticular variable.

    2009-03-10

    Ironman visual effects made on Linux

    by Forrest Sheng Bao http://fsbao.net

    You know the movie Ironman, right? You think it's cool, right? But do you know which OS supports those cool stuffs? The answer is our Linux!

    I checked out a DVD from my university library and watched a short video about how those visual effects were made. Then I found the desktop environment they used are just Gnome, a famous desktop environment on Linux.

    Here are 3 snapshots.


    2008-12-29

    Submitting jobs to a cluster in Sun Grid Engine

    by Forrest Sheng Bao http://fsbao.net

    I am only talking about SERIAL jobs! Parallel jobs may not work!

    Texas Tech deployed a new cluster Grendel, the 289th fastest computer in the world, this October. Recently, I am doing a research using boosting algorithms with SVM. So, i need to do lotta cross-validation computing. I plan to train weak classifiers independently on different cores. So there are a dozen serial jobs. Grendel's job is managed by Sun Grid Engine, which will distribute jobs to nodes in the cluster. After reading Sun Grid Engine documentation and with the help of some friends, I figured out how to submit jobs.

    The job receptor is called qsub. You need to write few lines like this (I prefer using a script, which will show the convenience later):

    #!/bin/sh
    #$ -V
    #$ -cwd
    #$ -S /bin/bash
    #$ -N nwchem
    #$ -o $JOB_NAME.o$JOB_ID
    #$ -e $JOB_NAME.e$JOB_ID
    #$ -q normal
    #$ -pe fill 8
    ssh $HOSTNAME "cd $PWD;/home/bao/libsvm/svm-train -v 14872 -c 2048 -g 0.5 1eq.scale.txt 1>1eq.out 2>&1" &
    ssh $HOSTNAME "cd $PWD;/home/bao/libsvm/svm-train -v 14872 -c 128 -g 2 2eq.scale.txt 1>2eq.out 2>&1" &
    ssh $HOSTNAME "cd $PWD;/home/bao/libsvm/svm-train -v 14872 -c 32 -g 2 3eq.scale.txt 1>3eq.out 2>&1" &
    ssh $HOSTNAME "cd $PWD;/home/bao/libsvm/svm-train -v 14872 -c 32 -g 2 4eq.scale.txt 1>4eq.out 2>&1" &
    ssh $HOSTNAME "cd $PWD;/home/bao/libsvm/svm-train -v 14872 -c 128 -g 2 5eq.scale.txt 1>5eq.out 2>&1" &
    ssh $HOSTNAME "cd $PWD;/home/bao/libsvm/svm-train -v 14872 -c 2048 -g 0.5 6eq.scale.txt 1>6eq.out 2>&1" &
    ssh $HOSTNAME "cd $PWD;/home/bao/libsvm/svm-train -v 14872 -c 32 -g 2 7eq.scale.txt 1>7eq.out 2>&1" &
    ssh $HOSTNAME "cd $PWD;/home/bao/libsvm/svm-train -v 14872 -c 32 -g 2 8eq.scale.txt 1>8eq.out 2>&1" &
    run=8
    while [ "$run" -ge 1 ]
    do
    sleep 60
    run=`ps ux | grep $HOSTNAME | grep -v grep | wc -l`
    done

    The last 8 lines are jobs need to do. Use qsub your_script to submit jobs. Then you can see 8 processes running on that node:

    top - 04:10:38 up 11 days, 12:39,  1 user,  load average: 8.13, 5.50, 2.47
    Tasks: 256 total, 9 running, 247 sleeping, 0 stopped, 0 zombie
    Cpu(s): 99.8%us, 0.2%sy, 0.0%ni, 0.0%id, 0.0%wa, 0.0%hi, 0.0%si, 0.0%st
    Mem: 16431924k total, 2307148k used, 14124776k free, 219332k buffers
    Swap: 1020116k total, 0k used, 1020116k free, 971428k cached

    PID USER PR NI VIRT RES SHR S %CPU %MEM TIME+ COMMAND
    11210 bao 25 0 120m 107m 1044 R 100 0.7 0:37.68 svm-train
    11218 bao 25 0 120m 108m 1044 R 100 0.7 0:37.68 svm-train
    11245 bao 25 0 120m 108m 1044 R 100 0.7 0:37.46 svm-train
    11255 bao 25 0 122m 110m 1044 R 100 0.7 0:37.52 svm-train
    11221 bao 25 0 121m 108m 1044 R 100 0.7 0:37.68 svm-train
    11237 bao 25 0 120m 108m 1044 R 100 0.7 0:37.60 svm-train
    11240 bao 25 0 120m 108m 1044 R 100 0.7 0:37.35 svm-train
    11217 bao 25 0 121m 109m 1044 R 98 0.7 0:37.17 svm-train
    5603 sge 15 0 14608 2140 1544 S 2 0.0 0:10.77 sge_execd
    11444 bao 15 0 12716 1176 792 R 0 0.0 0:00.15 top
    1 root 15 0 10312 628 532 S 0 0.0 0:01.91 init

    There are some other necessary options, like -q ( to submit your job to which queue). You can refer Sun's document. http://wikis.sun.com/display/GridEngine/Grid+Engine

    To see the status of your jobs, simply type qstat. If it is running, you will see something like this:

    grendel:bao:/libsvm/10fold$ qstat
    job-ID prior name user state submit/start at queue slots ja-task-ID
    -----------------------------------------------------------------------------------------------------------------
    508 0.56000 ten.1-8 bao r 12/29/2008 17:37:12 development@compute-7-3.local 8

    You will see two files by default, like ten.1-8.o493 and ten.1-8.e493, which are standard output and error files. If you open the *.o* file, you can see things which are expected to be shown in the shell. Of course, clusters use something like NFS, so don't worry about files generated by your own program.

    To kill a job, just type qdel followed by your job ID.

    There is a GUI interface called qmon. You can monitor all jobs in a graphic window. Awesome! I feel like that I am a commander of an army. And if you see a job on pending status too long, you can click "Why?" button and check what the problem is. You can even submit jobs using this GUI and store all parameters into a file to use later.

    2008-12-12

    Ubuntu Linux installation CD being sold in BestBuy store

    by Forrest Sheng Bao http://fsbao.net

    I went to BestBuy store (BestBuy is the largest consumer electronics and computer retailer in US and Canada) today. I heard Ubuntu Linux installation CD with technical support subscription is sold in BestBuy. So I checked with the operating system shelf. Next by dozens of boxes of Windows XP/Vista, was the Ubuntu disks.

    I couldn't find the version information. So I asked one sells man in the store. He said the version should be Hardy Heron, which is the code name of Ubuntu 8.04 LTS. I was surprised to hear that he knew Ubuntu and the version number. He even told me since the Ubuntu Linux is open sourced, you can upgrade it to the latest version for free from the Internet. Wow! Linux now at least make sells men know her.

    I was so excited to see Ubuntu being sold in the top 1 computer retail store and being put together with Microsoft Windows. This is a great victory for us, the open source community, which includes many industry leaders, such as IBM, HP or Google. You know, you could not imagine this 10 years ago.

    I really have to say that after Ubuntu was born, the position of Linux in desktop market has been changed a lot. Before that, the opem source community doesn't care much about common users. They just care making things work in their own geeky way. But Ubuntu even provides better experience than Mac and much more convenience features.

    So, I bought the pack, though I know I can download the ISO and burn the disk for free, legally. It's so exciting. After coming back, I took some pictures for that box. Here it is:

    The cover and the bar code:

    The inner page:

    The back side:

    The technical support registration code

    See the $19.99 item :