Step 1: Download MPLAB X and XC compiler
Go to http://www.microchip.com/pagehandler/en-us/family/mplabx#downloads Note that MPLAB X is the IDE but it requires the XC compiler to compile the code. You need to download both of them. For the correct compiler, please check "Which Compiler Is Right For You?" section of this page.
Step 2: Run the installer
forrest@laputa:~/Downloads$ ls
MPLABX-v1.85-linux-installer.run
forrest@laputa:~/Downloads$ chmod a+x MPLABX-v1.85-linux-installer.run
forrest@laputa:~/Downloads$ sudo ./MPLABX-v1.85-linux-installer.run
You need to do
sudo because MPLAB X will also install driver programs for USB programmers, e.g., PICkit3.The default installation destination is
/opt/microchip/mplabx. But you can install it to other places. Near the end, you will see a pop-up notification that rebooting is needed after installation. Accept it and wait until the installer finishes. Do not consider that the installer is dead.
If you use GNOME desktop, you should find the program's shortcut under "Applications" -> "Programming" - > "MPLAB X IDE".
The installer does not work with Unity desktop environment on Linux. You won't find it in Launcher. To run it for the first time, run
YOUR_MPLABX_INSTALLATION_DESTINATION/mplab_ide/bin/mplab_ideStep 3: Configuration
The most important thing is to set XC compiler. Go to "Tools" -> "Options". Then select "Embedded". In "Build Tools" tab, click "Add" button under "Toolchain". Select the correct path to an XC compiler that you need. Finally, click "OK" all the way back.
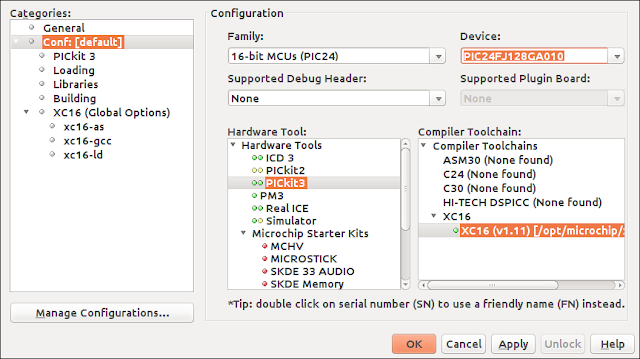
Also, ensure that you select correct target chip, downloader and compiler for your project as follows.

Now, you can use the IDE to compile your code and download them to your target system - if you have a proper downloader (e.g., PICkit3) configured.

No comments:
Post a Comment